Groups
Sprinkle gives you the flexibility to be in control of your data, and manage access & permissions of groups of users.
Managing, assigning & adjusting various permissions for a huge number of users can be a tedious task. Hence, use groups to efficiently manage access of similar kinds of users.
To quickly get you started with managing the accessibility, Sprinkle has default groups created.
Default Groups
Section titled “Default Groups”Administrator :shield:
Section titled “Administrator :shield:”The Admin has complete access to the tool and has no restrictions. They are in charge of administering and facilitating everything on the platform. Admins can be senior members of the data team who has detailed knowledge of the various data systems. The admin can manage other users on the platform and their access.
Data Team :woman_technologist::man_technologist:
Section titled “Data Team :woman_technologist::man_technologist:”Their permissions are similar to an admin’s, except for the administrative permissions. On the platform, they have access to everything they need to build pipelines, models, reports, dashboards, and more. They can create new datasets from data sources, build models, SQL Transforms, Reports, SQL explore, etc. The group can be used to manage and provide access to Data Engineers and Data Analysts.
Business Team :man_office_worker::woman_office_worker:
Section titled “Business Team :man_office_worker::woman_office_worker:”This group of users can create and view reports and dashboards. In addition to consuming data assets, users can also create them using self-serve analytics features.
Viewers :eyes:
Section titled “Viewers :eyes:”They have view-only permissions on reports and dashboards.
API_Access Grp :robot:
Section titled “API_Access Grp :robot:”Made to provide API access, this group has permissions to view SQL Explore, Reports, and Model functionalities, along with the create and edit permissions on SQL Transform and Pipelines .
Default permissions of these default groups are covered in the permissions section below.
Create New Group
Section titled “Create New Group”Sprinkle provides an option to also create groups according to the customized needs of a group of users in the organization.
To create a new group, through the left navigation panel, :mouse_three_button:click on Admin -> Access Management -> Groups. :mouse_three_button:Click on New Group.
What are Groups made of?
Section titled “What are Groups made of?”Members :people_holding_hands:
Section titled “Members :people_holding_hands:”Admin can add members to the group easily, just click on Add to get started. From the available drop-down list of the users in Sprinkle, Admin can select the users to add them to the group.
Permissions
Section titled “Permissions”Using the easy & intuitive UI, admins can easily manage the permissions of various groups across the various modules in Sprinkle. Below is a snapshot of the default permissions for the users in various groups.
Group Permissions - Snapshots
Section titled “Group Permissions - Snapshots”Admins :shield:
Section titled “Admins :shield:”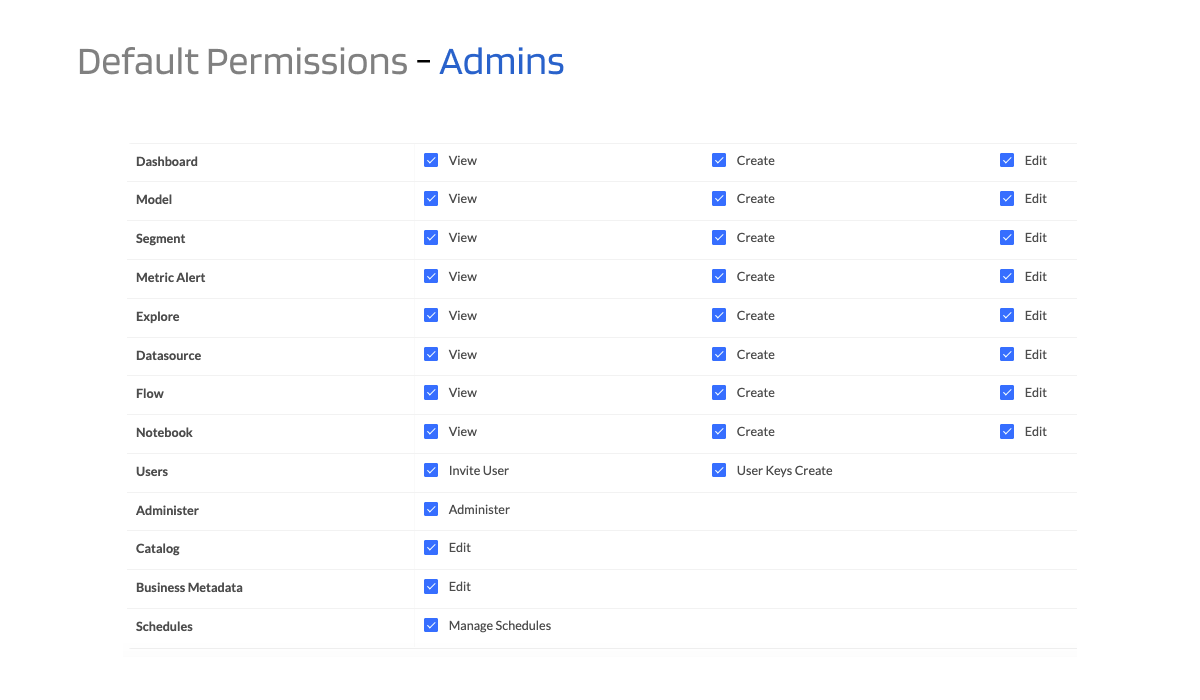
Data Team :woman_technologist::man_technologist:
Section titled “Data Team :woman_technologist::man_technologist:”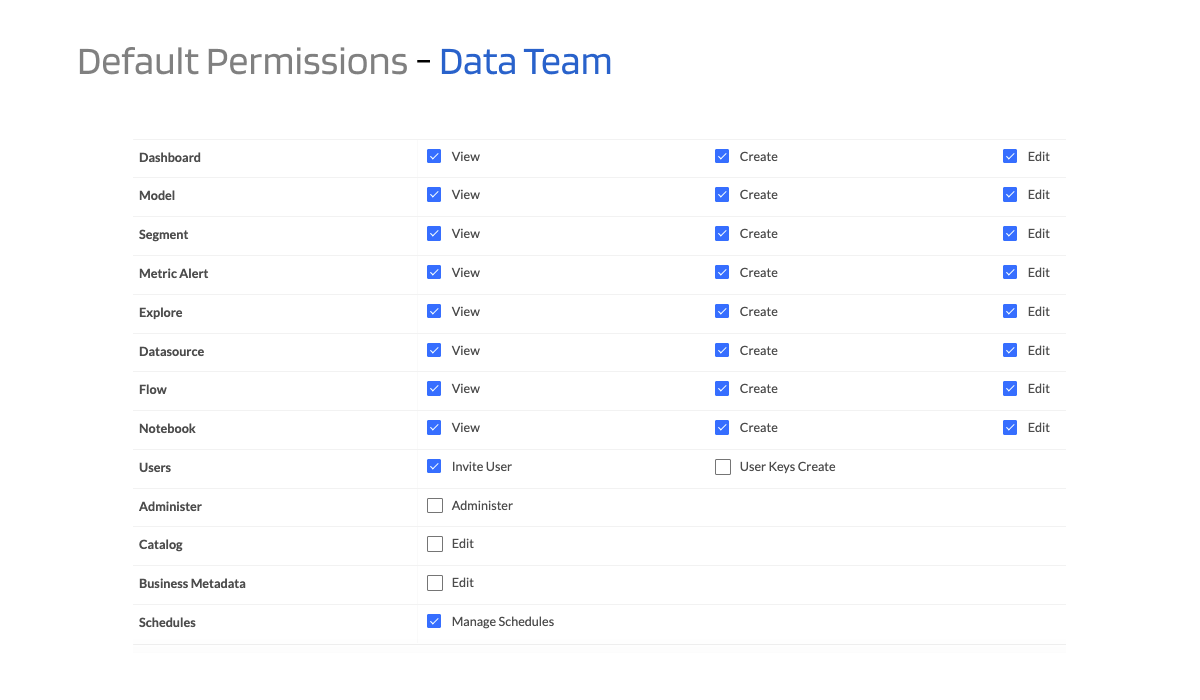
Business Team :man_office_worker::woman_office_worker:
Section titled “Business Team :man_office_worker::woman_office_worker:”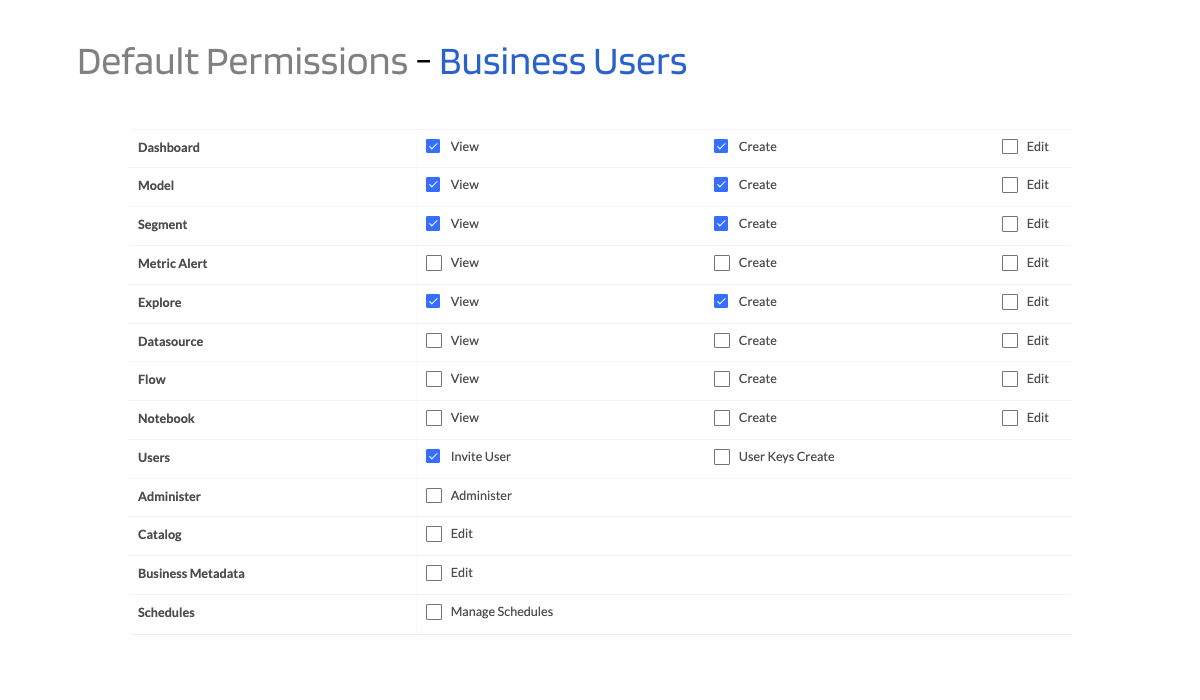
Viewers :eyes:
Section titled “Viewers :eyes:”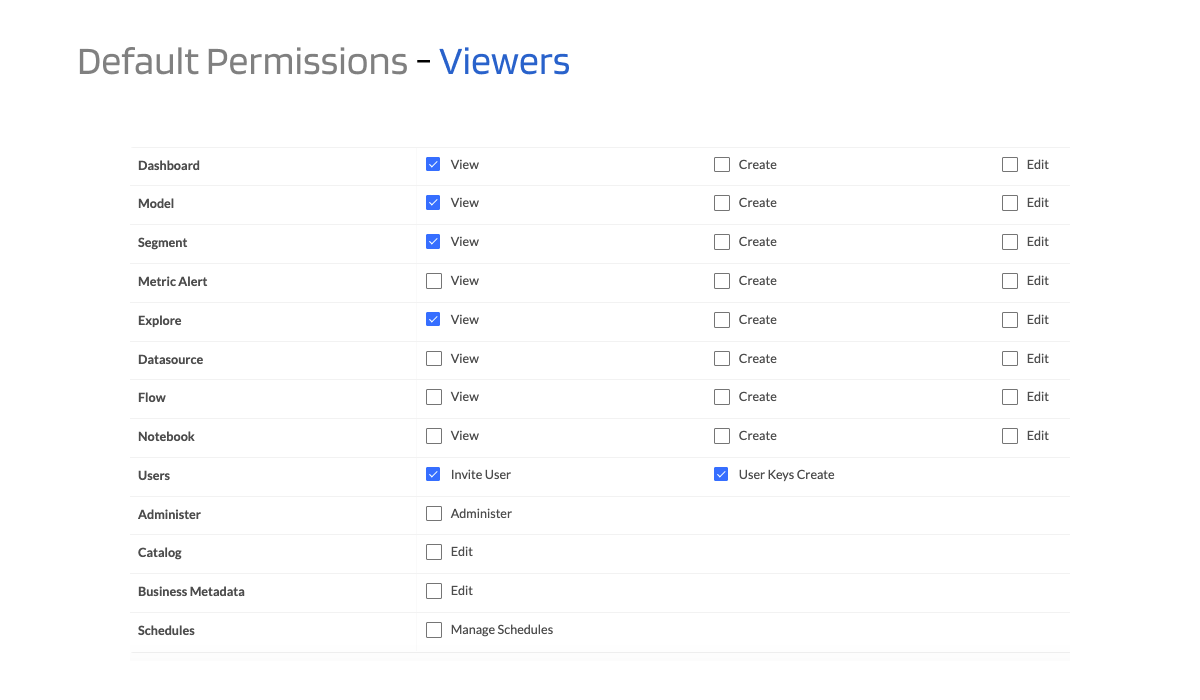
API :robot:
Section titled “API :robot:”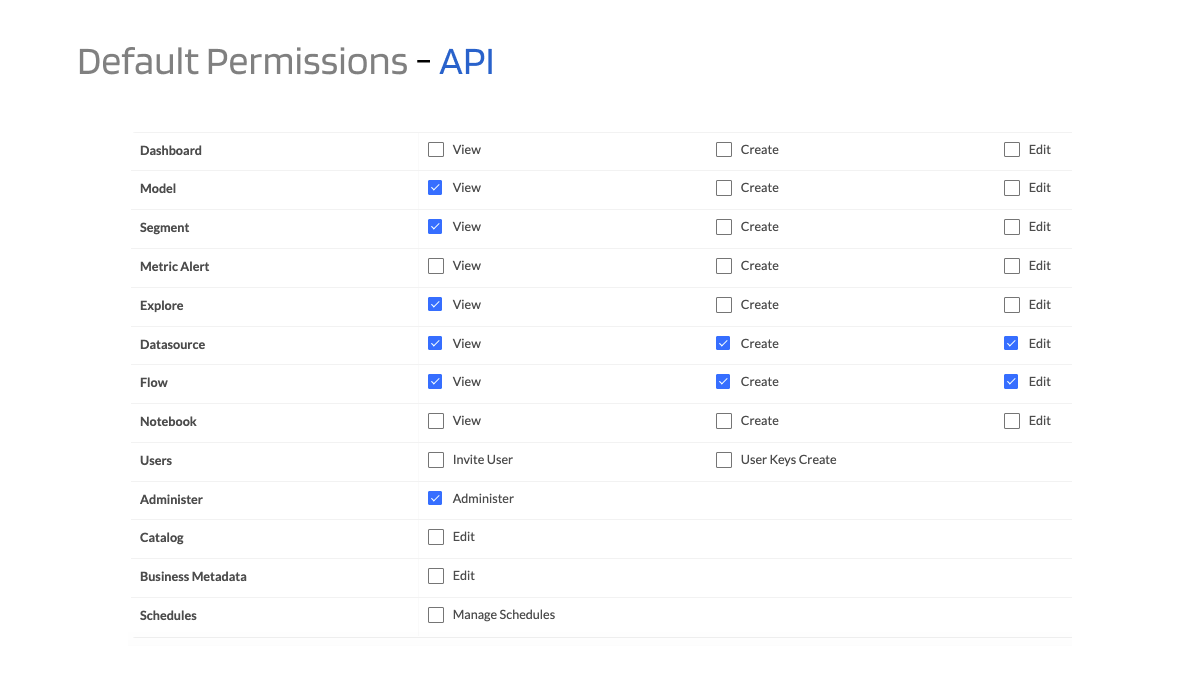
Table Permissions
Section titled “Table Permissions”Overview
Section titled “Overview”The Table Permissions feature allows administrators to control access to individual database schemas and tables for each user group.
With this feature, you can:
- Define which schemas or tables a group can access.
- Grant Read or Write permissions at the table level.
- Exclude specific tables from a group’s permissions.
- Customize table-level access independently for different groups.
This provides more granular control over data access and helps administrators restrict sensitive tables when required.
Navigation
Section titled “Navigation”To configure Table Permissions:
Access Management → Groups → Select a Group → Table Permissions
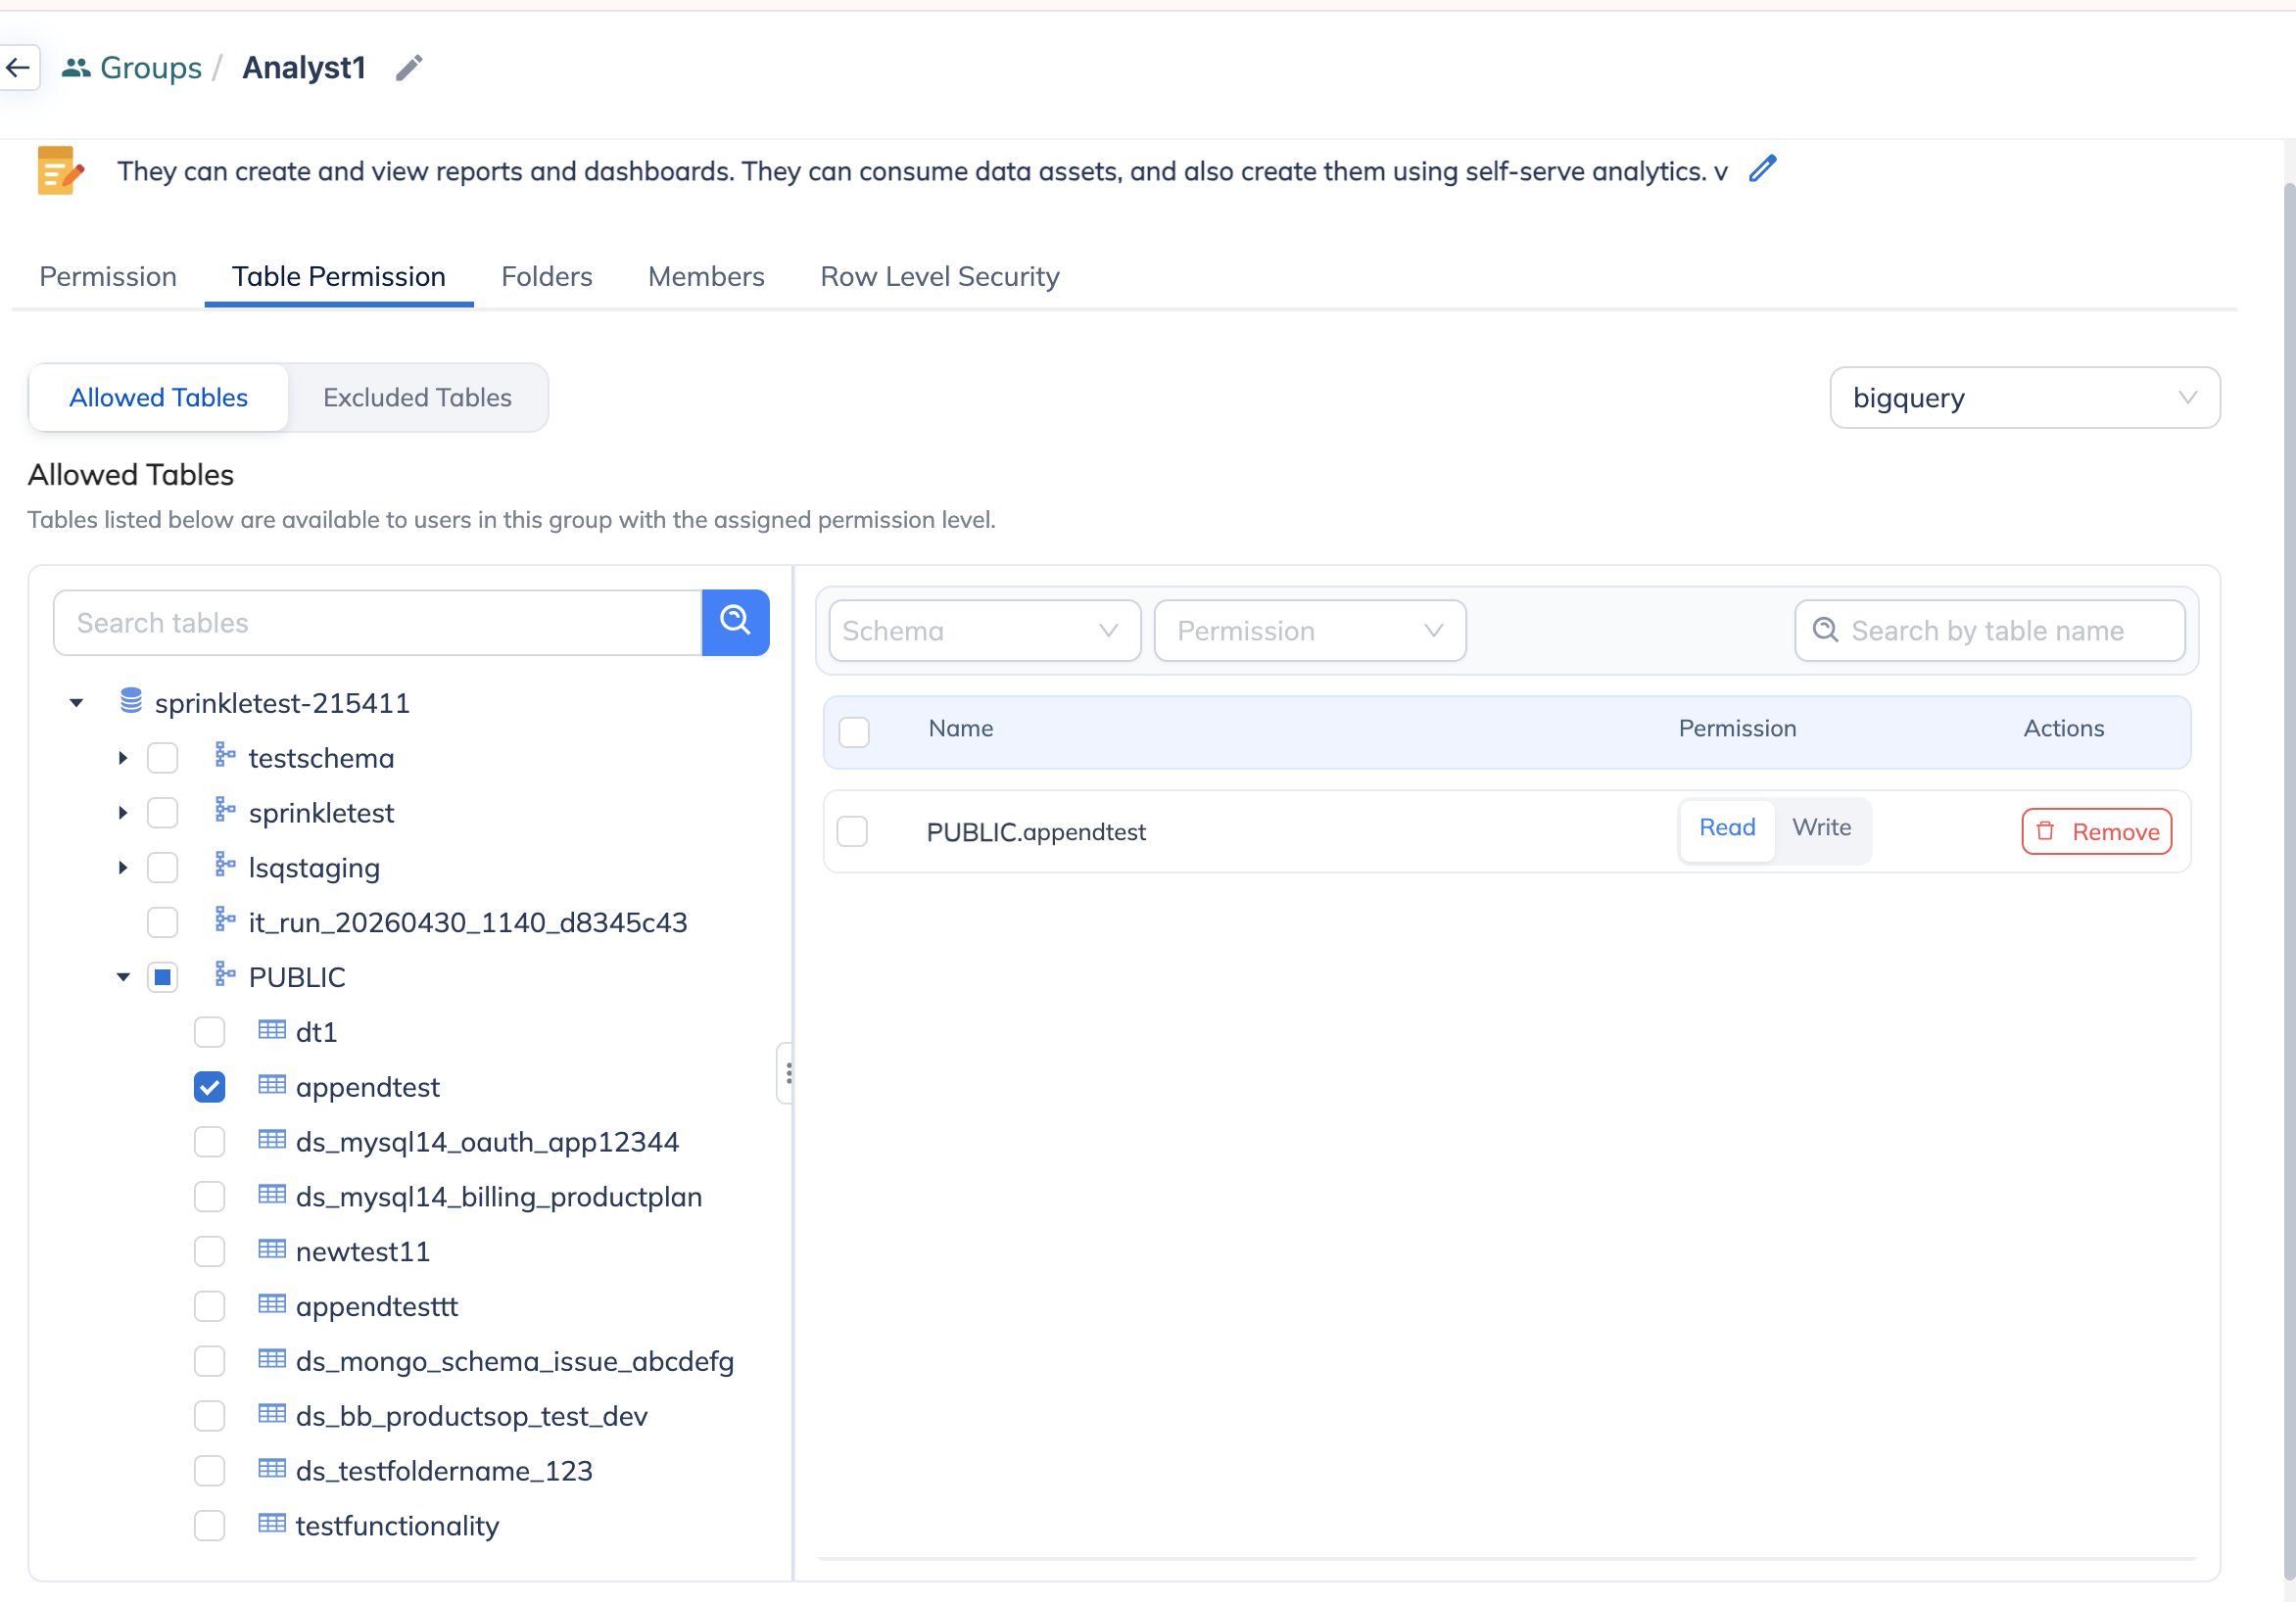
Configure Table Permissions
Section titled “Configure Table Permissions”Step 1: Open a Group
- Navigate to Access Management.
- Select Groups.
- Open the group for which you want to configure permissions.
- Navigate to the Table Permissions tab.
Step 2: Select a Schema or Table
Within the Table Permissions tab:
- Select the required Schema/Table.
- The selected schema or table will be added to the permissions table on the left side.
- You can add multiple schemas or tables based on the access requirements of the group.
Step 3: Assign Permissions
Once a schema/table has been added, configure the permissions that the group should have.
Available permissions include:
- Read – Allows users in the group to view or retrieve data from the selected table.
- Write – Allows users in the group to create, update, or modify data in the selected table, based on the system’s supported operations, along with all the Read permissions.
You can provide either Read or Write permissions depending on the group’s requirements.
Exclude Tables
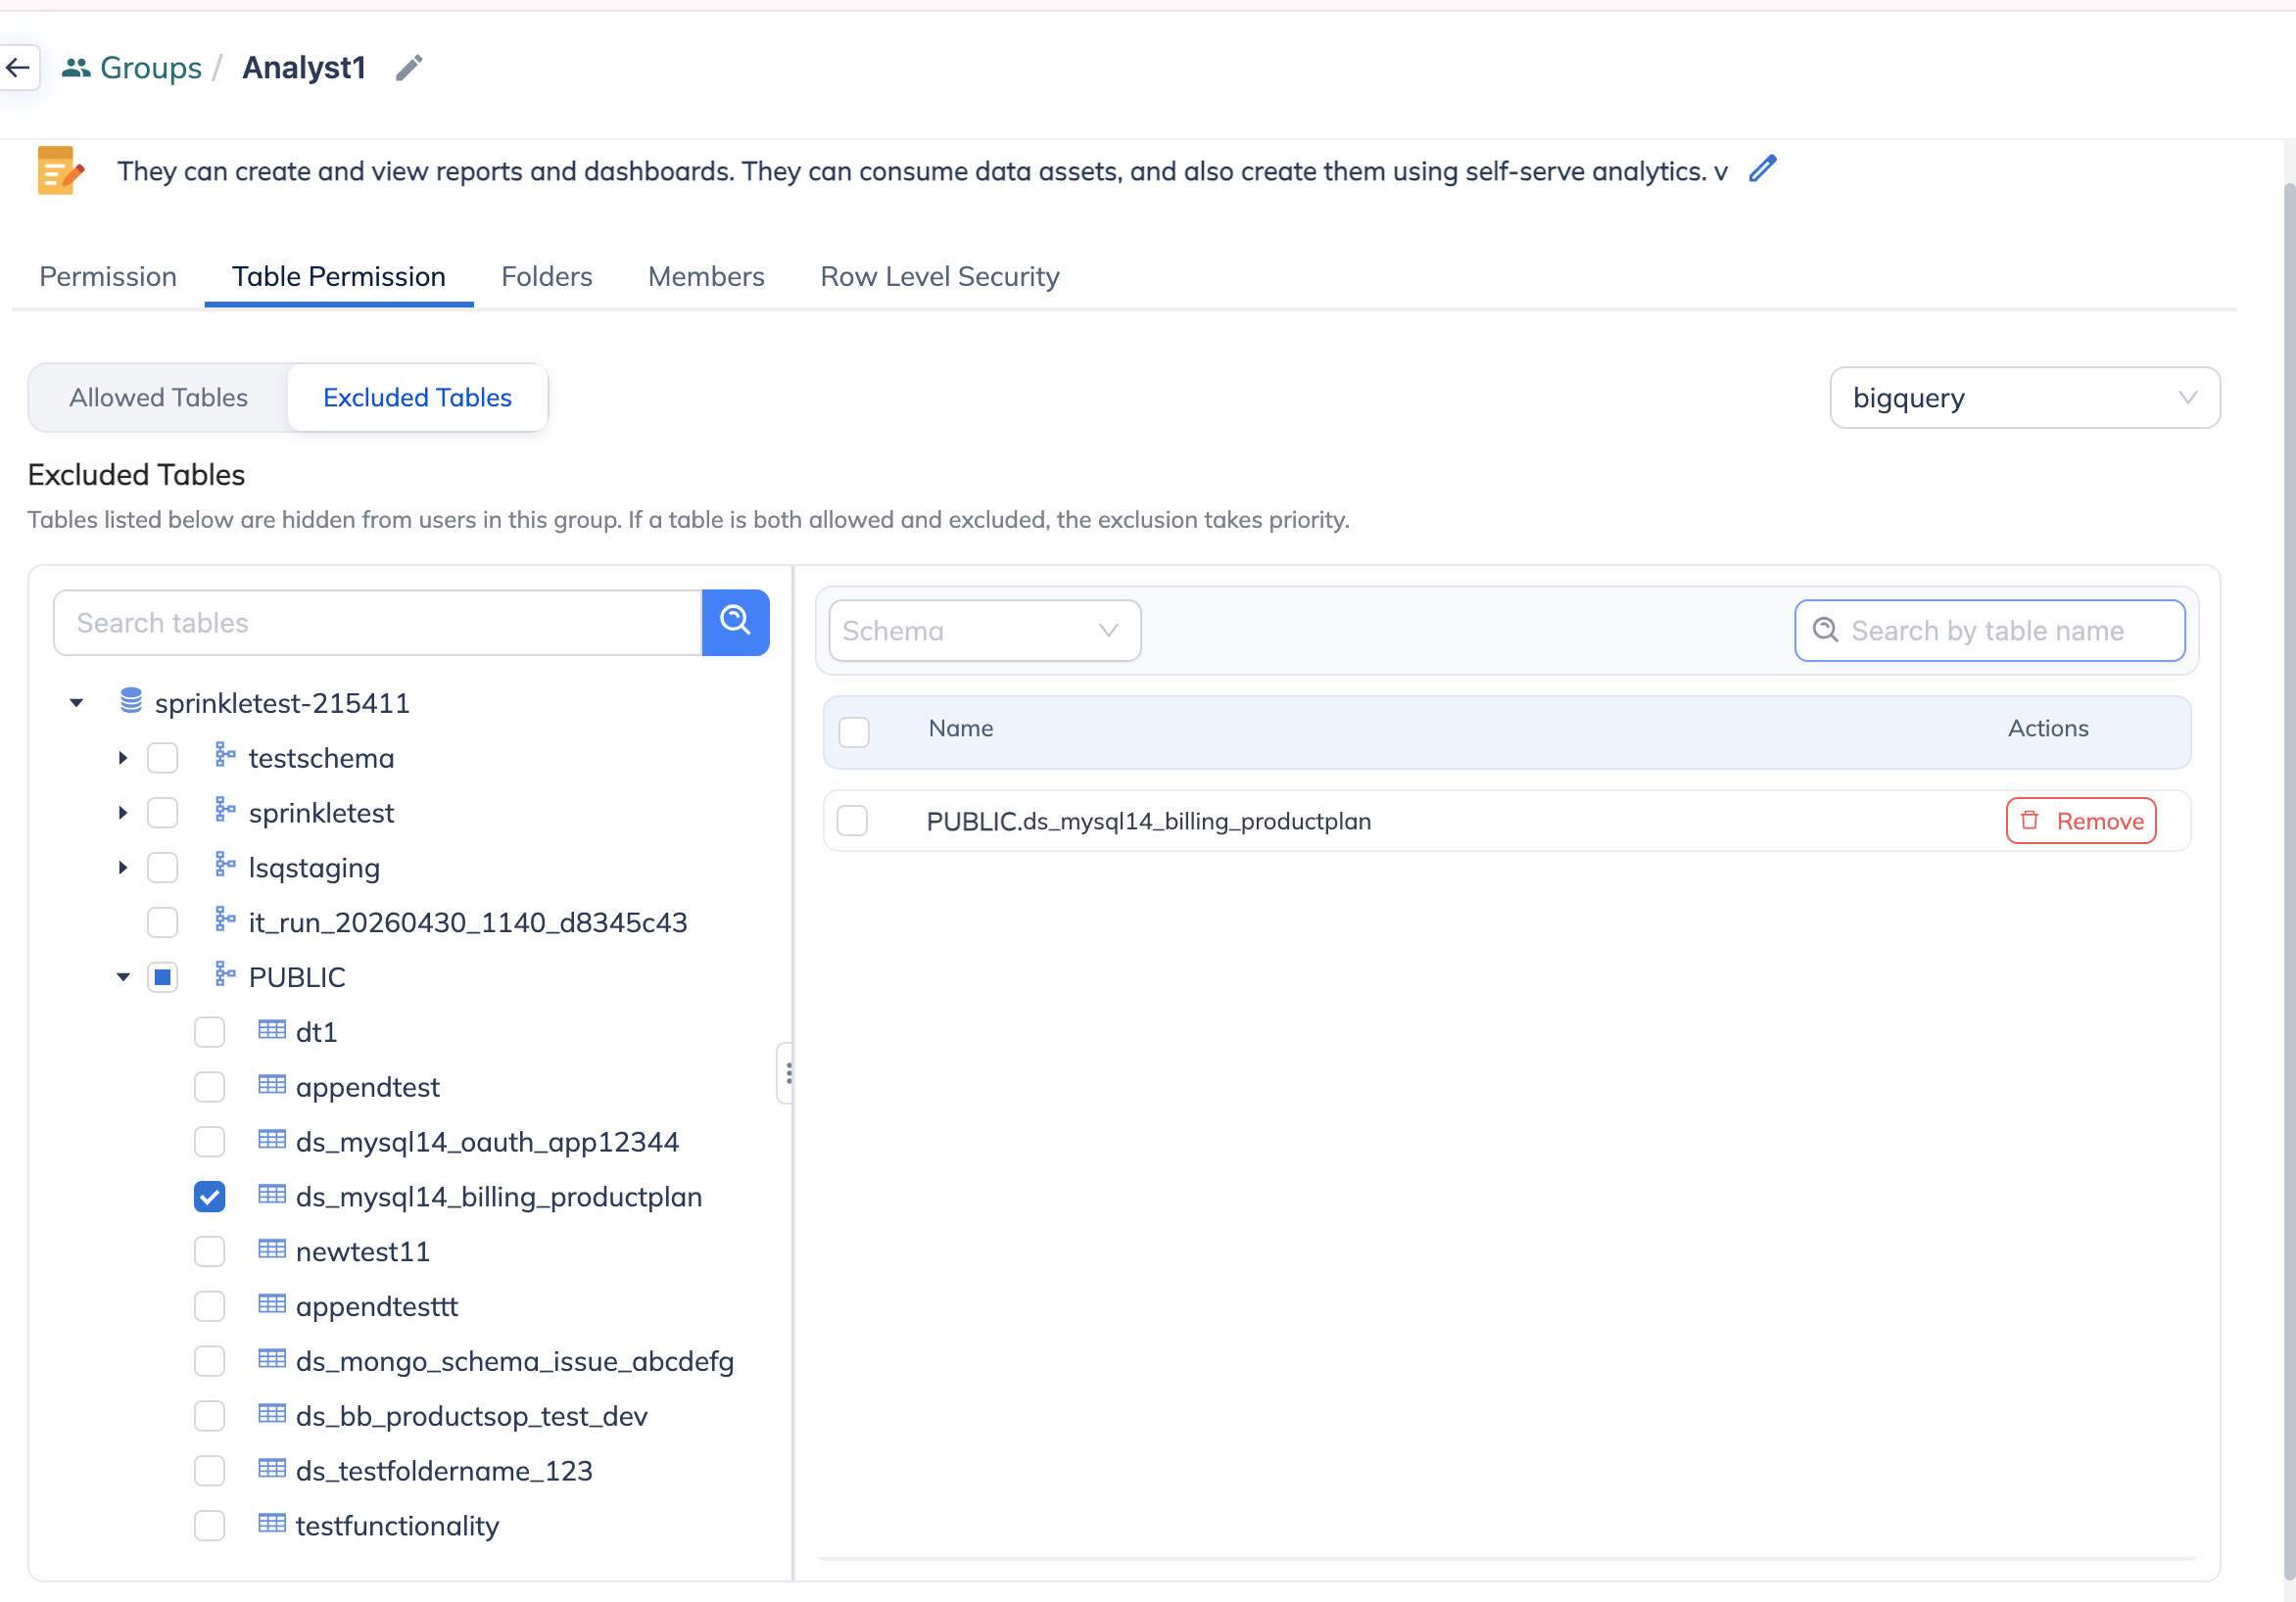
Section titled “Exclude Tables”The Excluded Tables section allows you to restrict access to specific tables even when broader permissions have been assigned.
To exclude a table:
- Navigate to the Excluded Tables section.
- Select the schema/table that you want to restrict.
- The selected table will be added to the excluded tables list.
- Users belonging to the group will not receive the configured permissions for the excluded table.
This is useful when a group needs access to most tables within a schema but should not have access to specific sensitive or restricted tables.
Key Benefits
- Granular access control: Manage permissions at the individual table level.
- Group-based configuration: Define access once for a group and apply it to its users.
- Read/Write control: Separately manage viewing and modification rights.
- Data restriction: Explicitly exclude sensitive tables from group access.
- Improved security: Reduce unnecessary access to sensitive or critical data.
Summary
Table Permissions provides administrators with granular control over which groups can access specific schemas and tables and what actions they can perform.
Use Access Management → Groups → [Group] → Table Permissions to configure these permissions and use Excluded Tables when specific tables need to be restricted.
Folders
Section titled “Folders”Along with permissions to various modules, the admin can also manage the access of data to the users in the groups through folders.
Navigate to the folders tab and Add Folder, in case you want to provide additional access to a specific folder to the users in the group. Read more about folders here.
Row-level Security
Section titled “Row-level Security”Row-level security lets you manage the row-level access of the models. It lets you restrict users’ access only to the relevant rows of data in the table. For example, you can restrict users in Karnataka to access the sales data only relevant to Karnataka from the sales table.
:tools:Steps to Use Row-level Security
Section titled “:tools:Steps to Use Row-level Security”:digit_one:Define RLS Attribute - Admin Users
Section titled “:digit_one:Define RLS Attribute - Admin Users”The Row Level Security (RLS) feature allows you to define the columns on which an RLS attribute should be applied. Once configured, the selected column can be used to control data access at the row level.
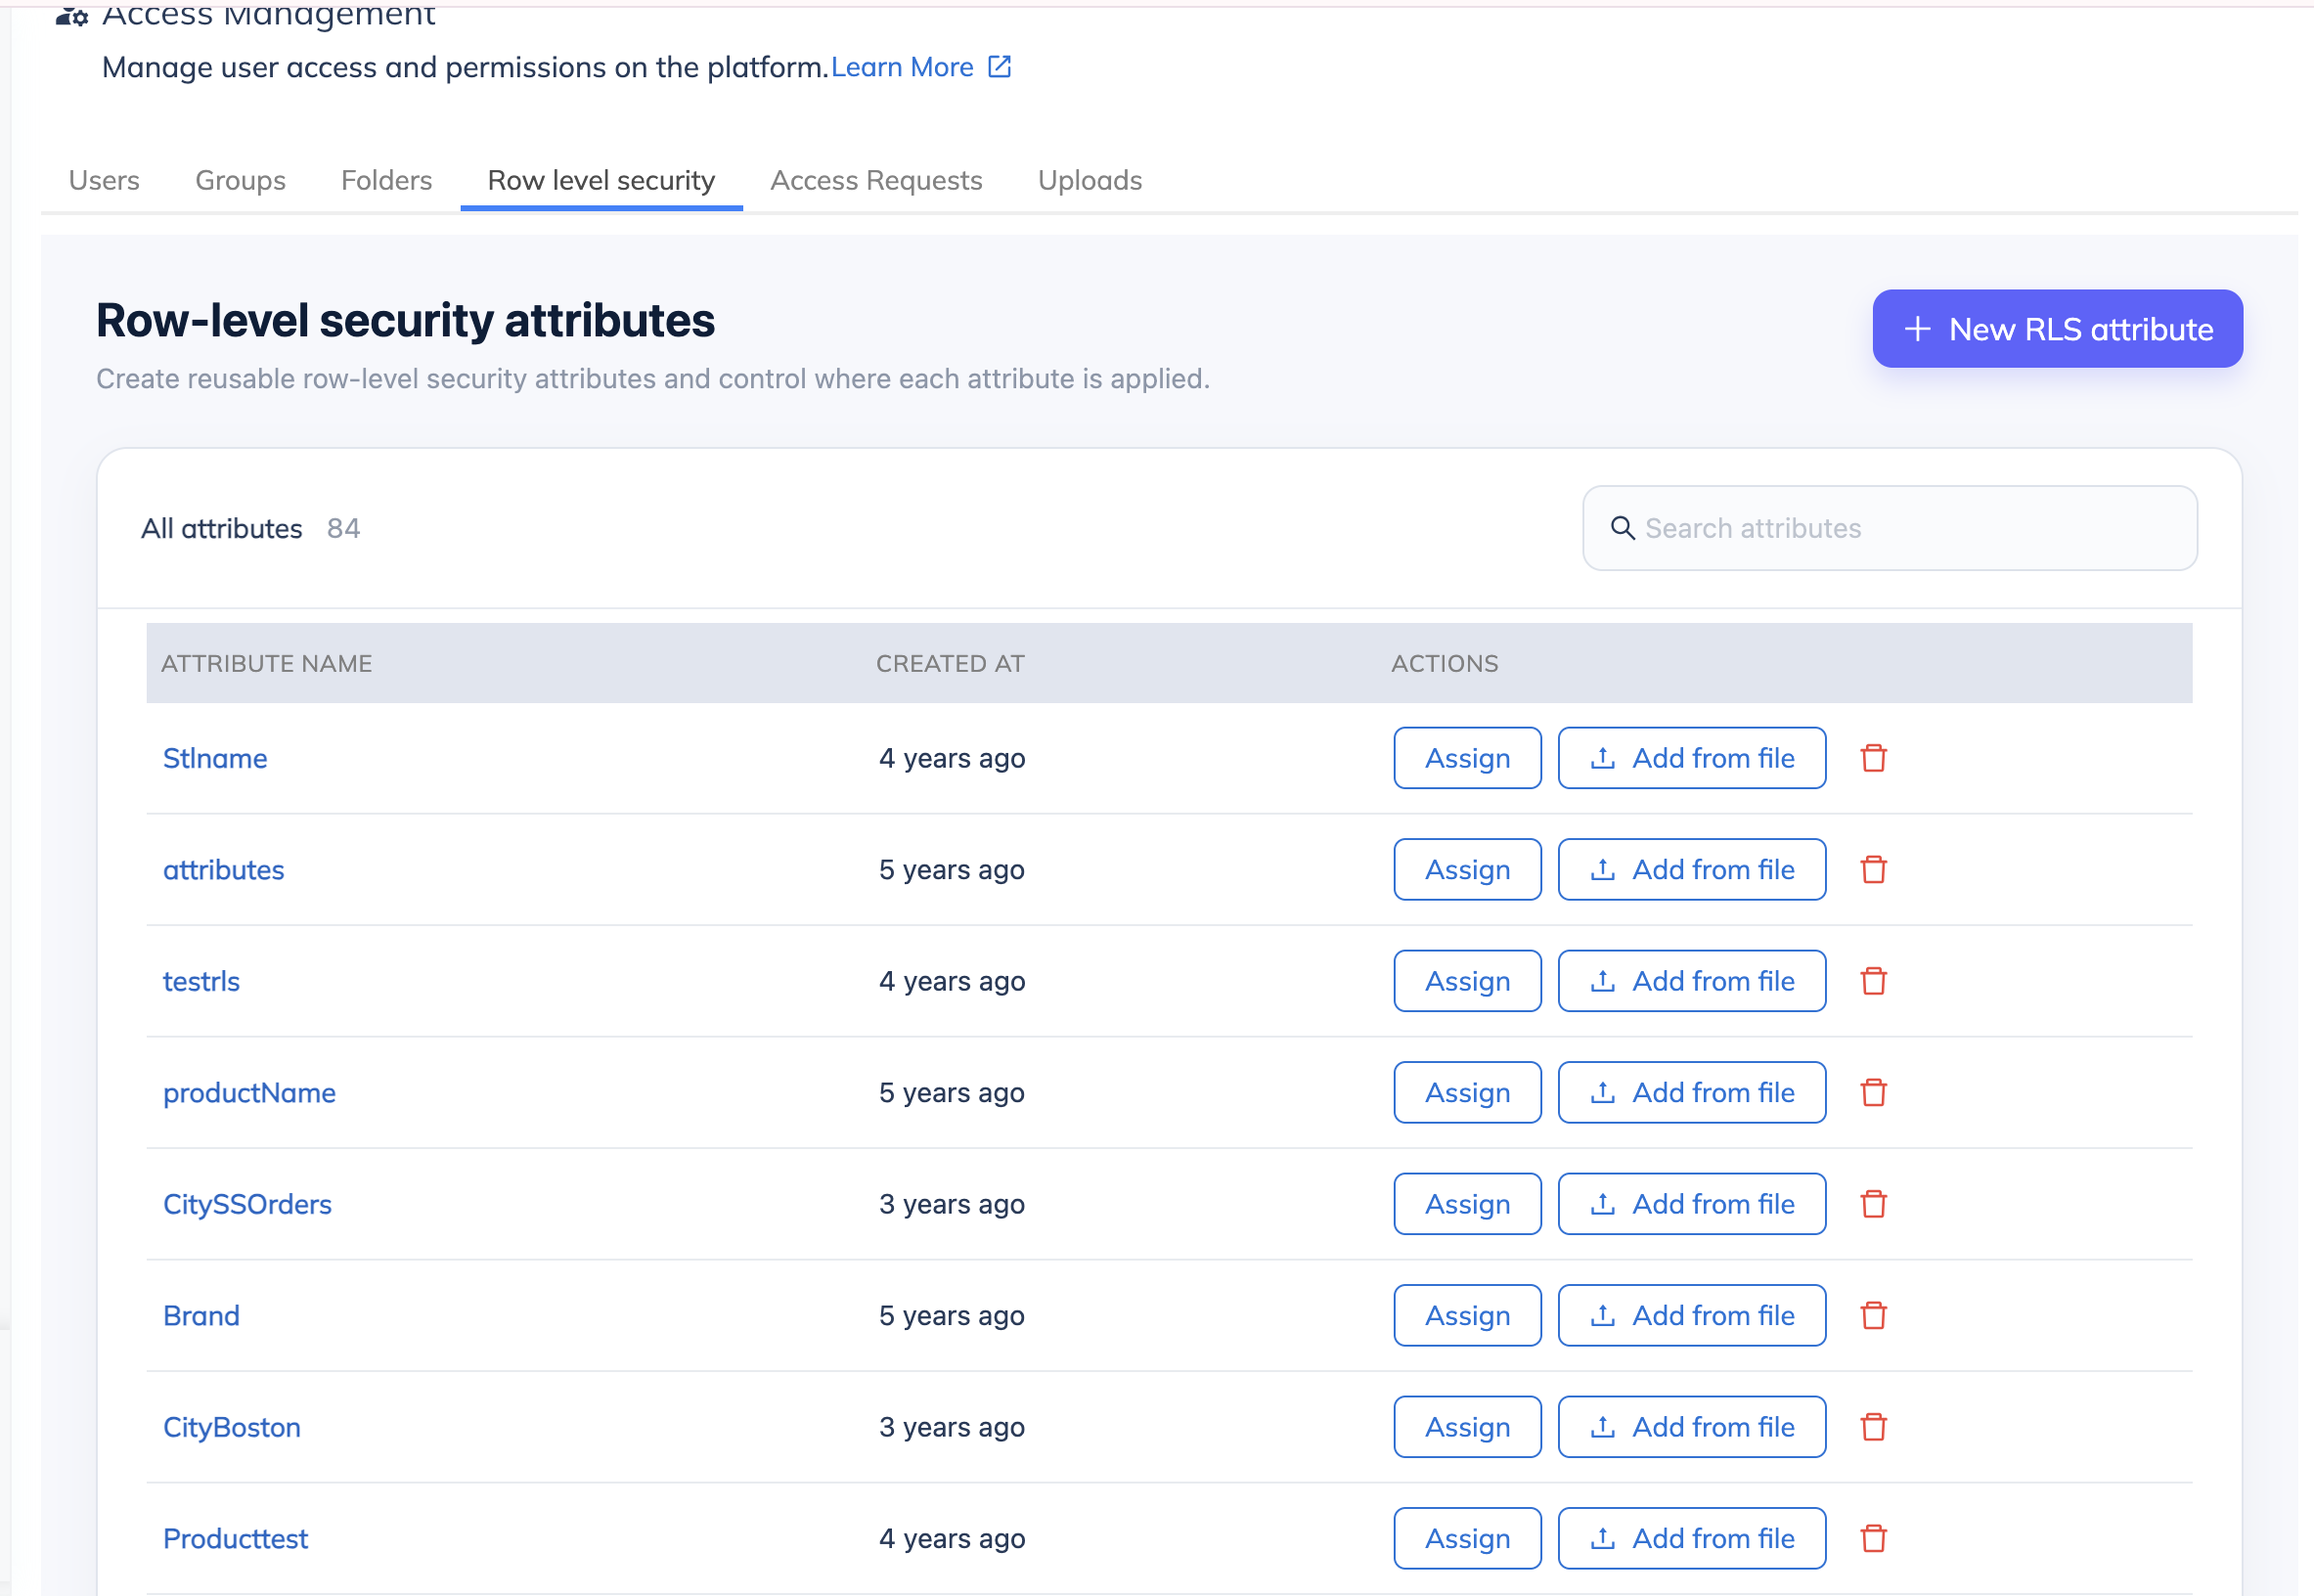
Creating an RLS Attribute
To create a new RLS attribute:
- Navigate to Access Management → Row level security.
- Click + New RLS attribute in the top-right corner.
- A modal opens asking you to enter the Attribute Name.
- Enter a unique and meaningful name for the RLS attribute.
- Create the attribute.
Once created, the RLS attribute will be available in the Row-level security attributes list.
Steps to Add an RLS Attribute
Section titled “Steps to Add an RLS Attribute”- Navigate to Admin -> Access Management → Row level security and open the required RLS attribute.
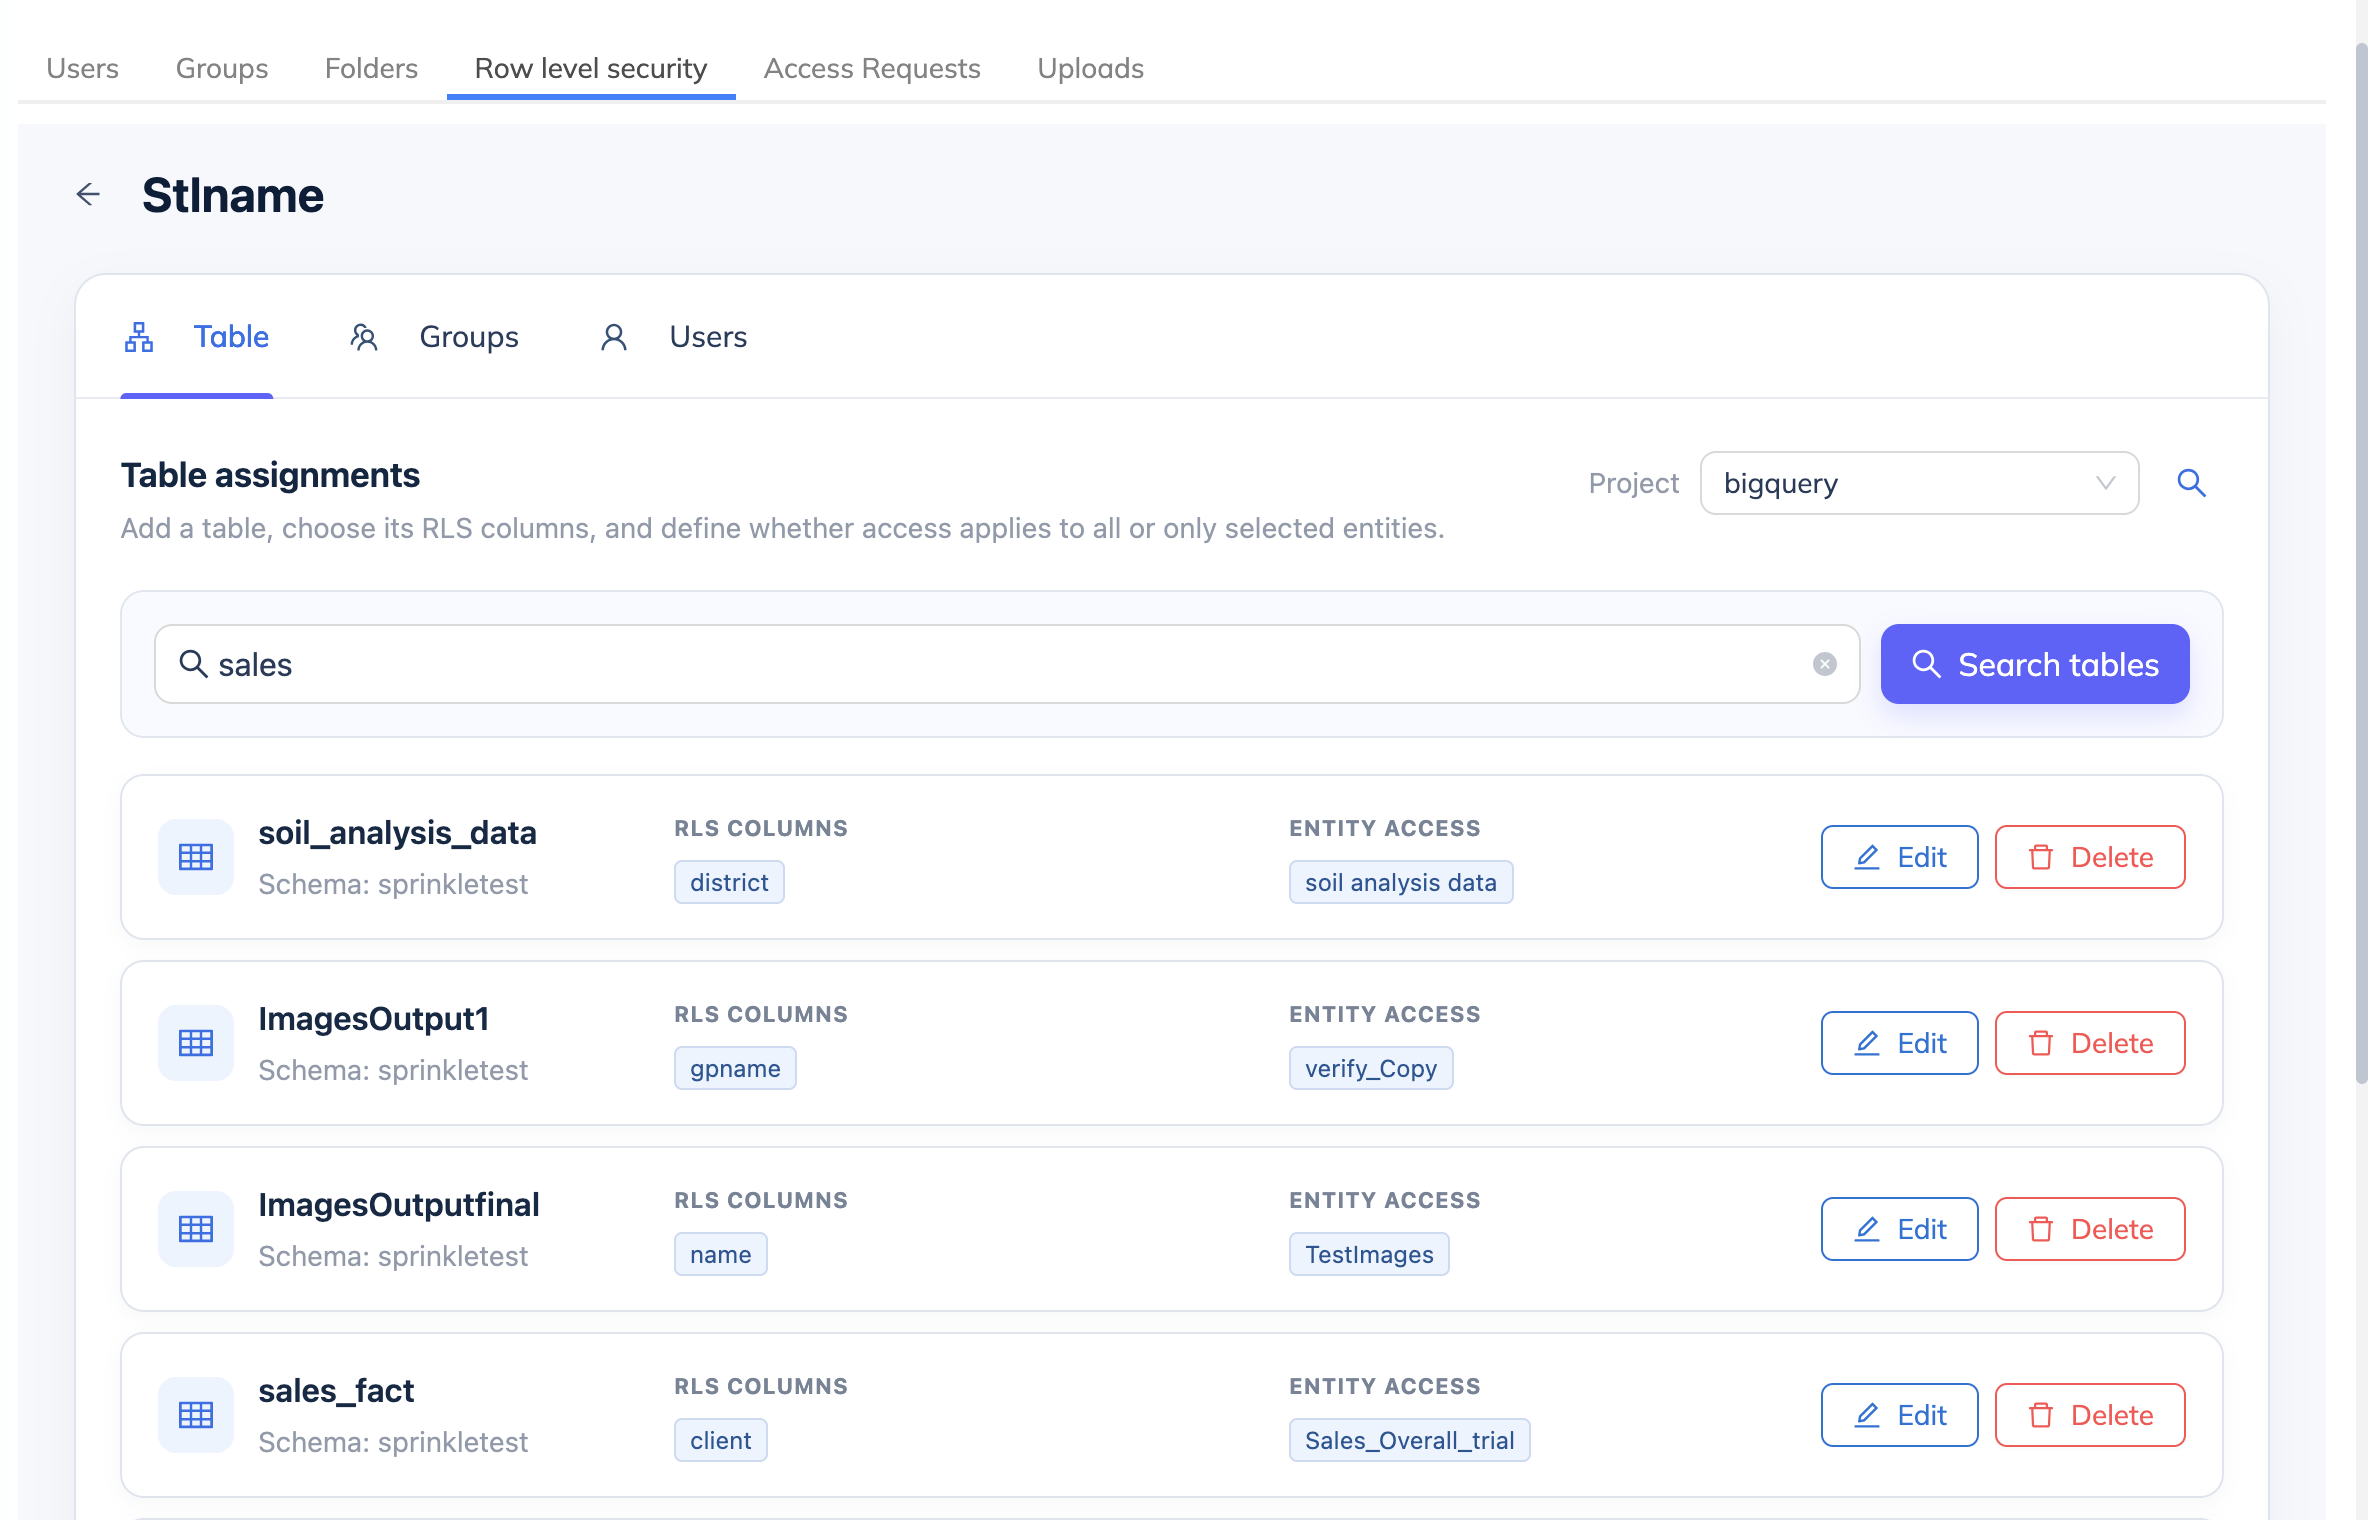
- In the Table assignments section, enter the table or schema name in the search box.
- Click Search tables.
- Select the required table, A modal will open
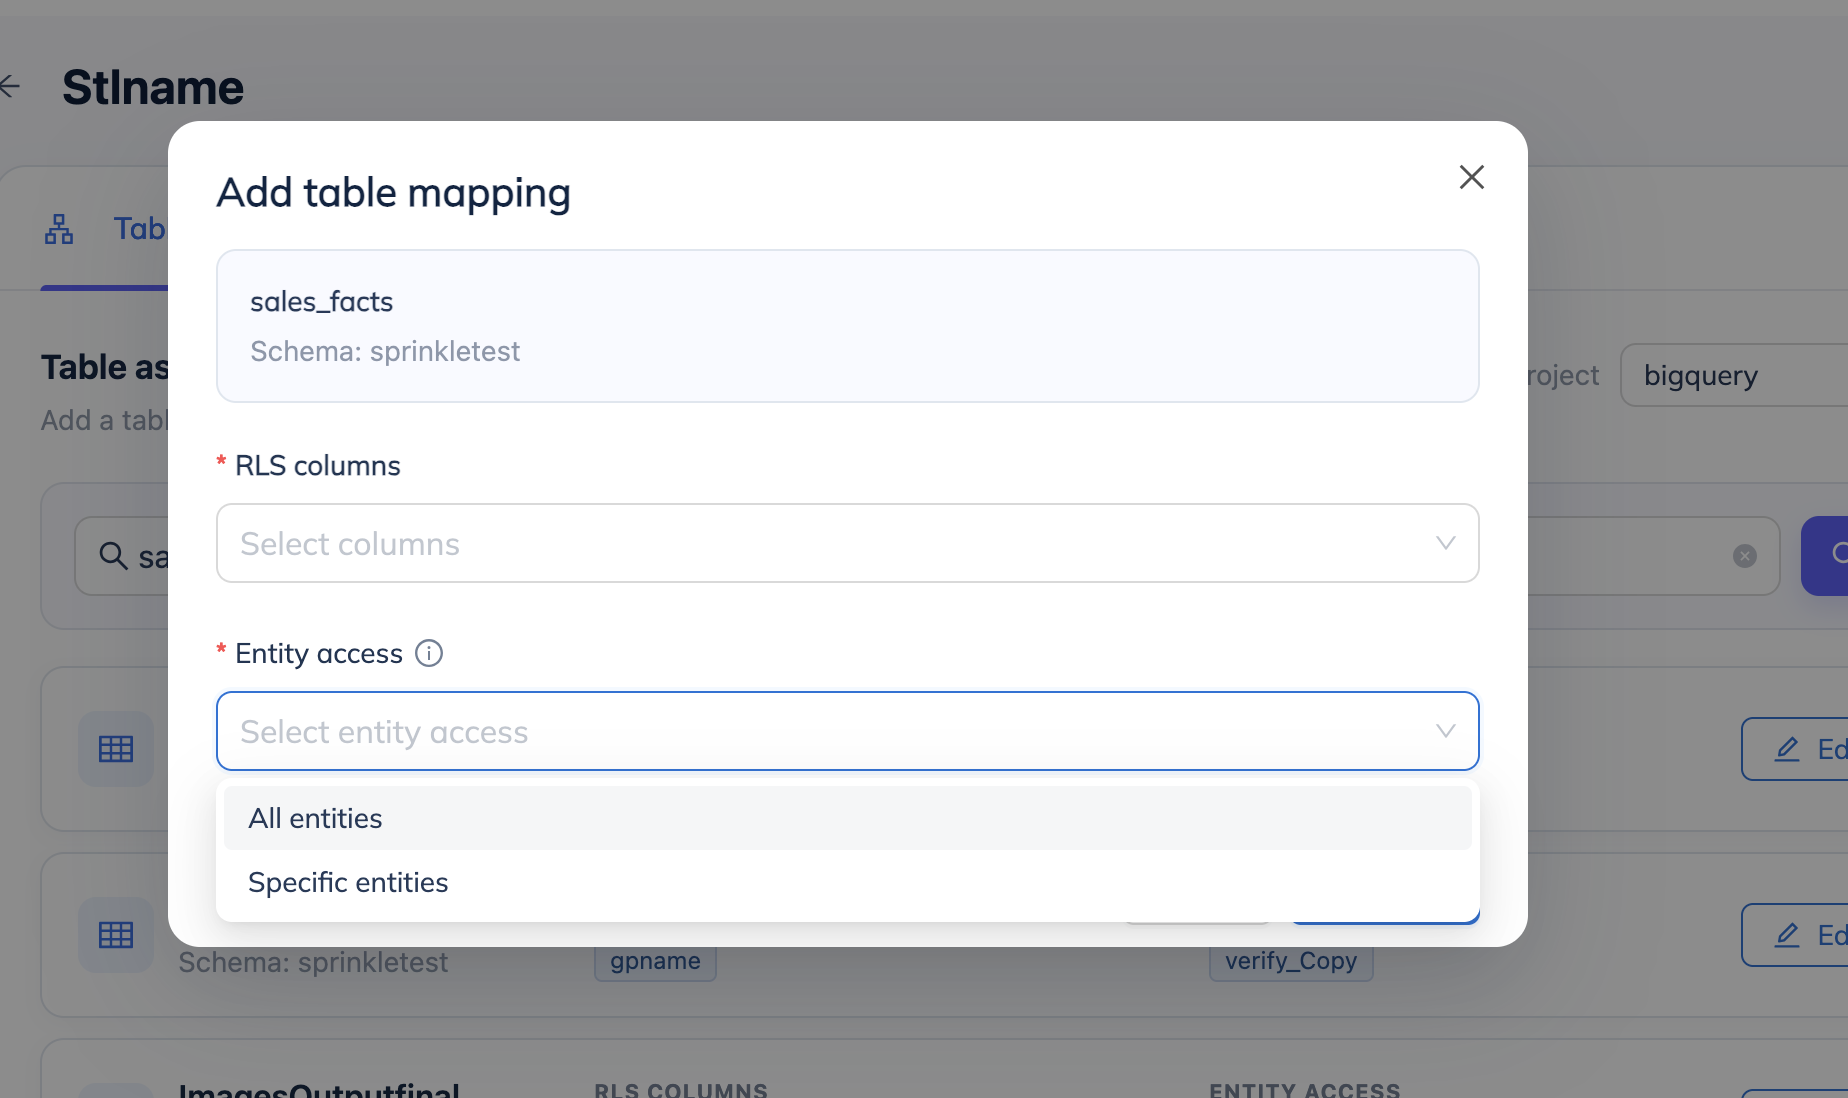
- Select RLS column on which you want to apply the RLS.
- For Entity Access -> Choose whether this RLS mapping applies to every entity associated with the table or only to entities you select.
- Click Add Table.
The RLS attribute is now assigned to the selected column of the table.
Example
Section titled “Example”For example, if the RLS attribute Stlname needs to be applied to the attributes_type column of the ds_salesforcepagetest_table_2 table:
- Table:
ds_salesforcepagetest_table_2 - Schema:
sprinkletest - Column:
attributes_type
Search for ds_salesforcepagetest_table_2 and click Search tables. The table will appear in the table assignments list.
Click Edit for the table, select attributes_type as the column, and click Save.
The Stlname RLS attribute is now applied to the attributes_type column of ds_salesforcepagetest_table_2.
Assigning RLS Values
Section titled “Assigning RLS Values”Once an RLS attribute has been configured for the required table and column, you can assign values to groups or individual users.
Assign RLS Values to a Group
Section titled “Assign RLS Values to a Group”- Navigate to the Groups tab within the RLS attribute.
- Click on +Assign Group.
- Select the required group from dropdown.
- Assign the appropriate value for the RLS attribute.
- Click on Assign.
The assigned RLS value will apply to users who are members of the group.
Assign RLS Values to a User
Section titled “Assign RLS Values to a User”- Navigate to the Users tab within the RLS attribute.
- Click on +Assign Group.
- Select the required user from dropdown.
- Assign the appropriate value for the RLS attribute.
- Click on Assign.
The assigned RLS value will apply directly to the selected user.