> For the complete documentation index, see [llms.txt](https://docs.sprinkledata.com/product/llms.txt). Markdown versions of documentation pages are available by appending `.md` to page URLs; this page is available as [Markdown](https://docs.sprinkledata.com/product/integrating-your-data/destination-warehouses/azure-synapse.md).
# Azure Synapse
This page covers the details about integrating Azure Synapse with Sprinkle.
When setting up a Synapse connection, Sprinkle additionally requires Azure Storage Container. This guide covers the role of all the components and the steps to set up.
* **Integrating Synapse**: All analytical data is stored and queried fromthe Synapse warehouse
* **Create Azure Storage Container**: Sprinkle stores all intermediate data and report caches in this bucket
Step-by-step Guide for intergrating Synapse
### **STEP-1: Allow Synapse to accept connection from Sprinkle**
Allow inbound connection on Synapse jdbc port (default is 1433) from Sprinkle IPs (34.93.254.126, 34.93.106.136).
### STEP-2: Configure Synapse Connection
* Log into Sprinkle application
* Navigate to Admin -> Warehouse -> New Warehouse Connection
* Select Azure Synapse
* Provide all the mandatory details
* ***Distinct Name***: Name to identify this connection
* **Host**: Provide IP address or Host name.
* **Port**: Provide the Port number.
* **Database**: Provide database name if there is any, it should be an existing database.
* ***Username***
* ***Password***
* ***Server Type***: You choose between **Dedicated** or **Serverless**.
* **External Data Source**: This is **only required for Serverless** Server Type
* **Advanced** **Settings**: It can be turned on/off based on the requirements. if yes:
* **Maximum Error Count**: If the load returns the error\_count number of errors or greater, the load fails. If the load returns fewer errors, it continues and returns an INFO message that states the number of rows that could not be loaded. Use this parameter to allow loads to continue when certain rows fail to load into the table because of formatting errors or other inconsistencies in the data. For reference, [see this](https://docs.microsoft.com/en-us/sql/t-sql/statements/copy-into-transact-sql?view=azure-sqldw-latest#maxerrors--max_errors)
* **Minimum Idle Connections**: This property controls the minimum number of idle connections in the pool.
* **Maximum Pool Size**: This property controls the maximum size that the pool is allowed to reach.
* Test Connection
* Create
Create Azure Storage Container
### Create Azure Storage Container
Sprinkle requires an Azure Storage container to store intermediate data and report caches.
**Note**: If the warehouse is Azure Synapse, the Date Lake Storage which is configured for Synapse Analytics(during creation) should be used here.
Follow the below steps to create and configure storage container:
#### STEP-1: Create a Storage Account
1. Login to the Azure Portal and select All Services.
2. Select Storage Account and choose Add.
3. Select the subscription in which you want to create the account.
4. Select the desired resource group or create a new resource group. You can refer to the [Azure Documentation](https://docs.microsoft.com/en-us/azure/azure-resource-manager/management/overview) of resource management.
5. Provide the storage name, this name should be unique across all the Azure storages. The name also must be between 3 and 24 characters in length, and may include only numbers and lowercase letters.
6. Select a location for your storage account, or use the default location.
7. Select a performance tier, recommended is *Standard*.
8. Set the Account kind field to *Storage V2 (general-purpose v2)*.
9. Specify other settings if anything is required
10. Select Review + Create to review your storage account settings and create the account.
11. Click on Create, it will create the account
#### STEP-2: **Create Storage Container**
1. Login and go to the new storage account in the Azure portal.
2. In the left menu for the storage account, select Containers from the Blob service section.
3. Click on the + Container button.
4. Provide a name for your new container. The container name must be lowercase, must start with a letter or number, and can include only letters, numbers, and the dash (-) character. Refer to the [Azure Documentation](https://docs.microsoft.com/en-us/rest/api/storageservices/naming-and-referencing-containers--blobs--and-metadata) for more information.
5. Set the level of public access to the container or you can whitelist the Sprinkle IP shown in Driver Setup.
6. Select OK to create the container.
You can refer to the [Azure quick start guide](https://docs.microsoft.com/en-us/azure/storage/blobs/storage-quickstart-blobs-portal) for Storage containers.
#### STEP-3: Get Access Key
1. Navigate to your storage account in the [Azure portal](https://portal.azure.com/).
2. Under Settings, select Access keys. Your account access keys appear, as well as the complete connection string for each key.
3. Locate the Key value under key1, and click the Copy button to copy the account key.
### **STEP-4: Configure Azure Storage connection in Sprinkle**
*
```
```
* Log into Sprinkle application
* Navigate to Admin -> Warehouse -> New Warehouse Connection -> Add Storage
* Select Azure Blob Store
* Provide all the mandatory details
* *Distinct Name*: Name to identify this connection
* *Storage Account Name*: Created in STEP-1
* *Container Name:* Created in STEP-2
* *Access Key: Copied in STEP-3*
* Test Connection
* Create
## Get JDBC URL
On the [Azure portal](https://portal.azure.com/) go to synapse workspace, then on the left side under the Analytics pools tab select sql-pools.
* Select the sql-pool for which you want to integrate to sprinkle.
* On the left side under the Settings tab select connection strings. Select JDBC, here copy JDBC URL(remove username and password from JDBC URL).
### If you don't have an existing Azure Synapse cluster
You can refer to the following/refer [azure documentation](https://docs.microsoft.com/en-us/azure/synapse-analytics/quickstart-create-workspace).
Create an Azure Synapse Analytics workspace
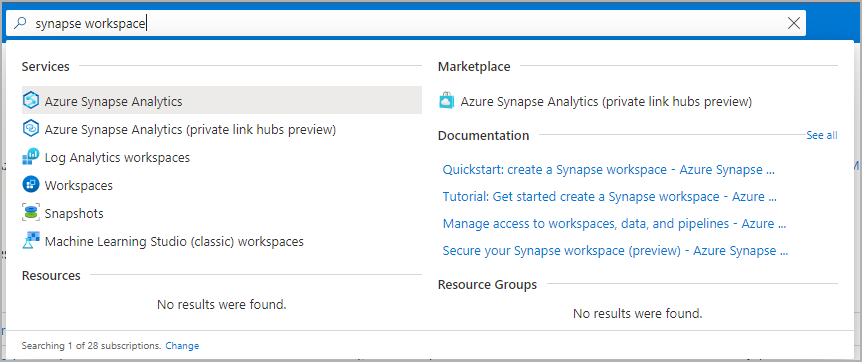
1. Open the [Azure portal](https://portal.azure.com/), and at the top, search for **Synapse**.
2. In the search results, under **Services**, select **Azure Synapse Analytics**.
3. Select **Create** to create a workspace.
4. On the **Basics** tab, give the workspace a unique name. We use **mysworkspace** in this document.
5. You need an Azure Data Lake Storage Gen2 account to create a workspace. The simplest choice is to create a new one. If you want to reuse an existing one, you need to perform extra configuration:
* Option 1: Create a new Data Lake Storage Gen2 account:
1. Under **Select Data Lake Storage Gen 2** > **Account Name**, select **Create New**. Provide a global unique name, such as **contosolake**.
2. Under **Select Data Lake Storage Gen 2** > **File system name**, select **File System** and name it **users**.
* Option 2: See the instructions in [Prepare an existing storage account for use with Azure Synapse Analytics](https://learn.microsoft.com/en-us/azure/synapse-analytics/quickstart-create-workspace#prepare-an-existing-storage-account-for-use-with-azure-synapse-analytics).
6. Your Azure Synapse Analytics workspace uses this storage account as the primary storage account and the container to store workspace data. The workspace stores data in Apache Spark tables. It stores Spark application logs under a folder named */synapse/workspacename*.
7. Select **Review + create** > **Create**. Your workspace is ready in a few minutes.
### Open Synapse Studio
After your Azure Synapse Analytics workspace is created, you have two ways to open Synapse Studio:
* Open your Synapse workspace in the [Azure portal](https://portal.azure.com/). At the top of the **Overview** section, select **Launch Synapse Studio**.
* Go to [Azure Synapse Analytics](https://web.azuresynapse.net/) and sign in to your workspace.
### Prepare an existing storage account for use with Azure Synapse Analytics
1. Open the [Azure portal](https://portal.azure.com/).
2. Go to an existing Data Lake Storage Gen2 storage account.
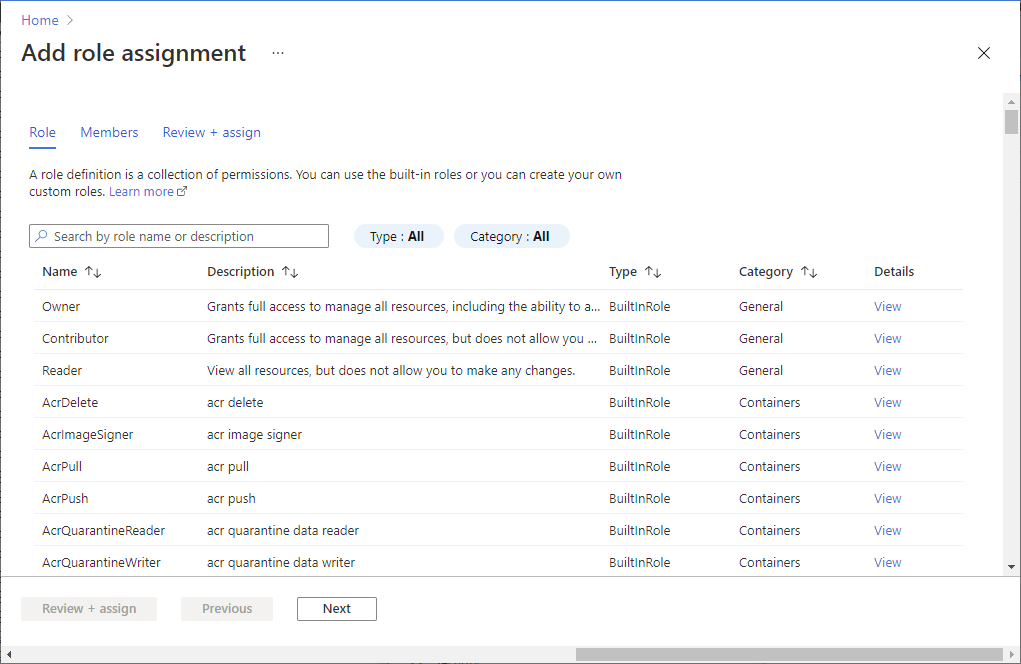
3. Select **Access control (IAM)**.
4. Select **Add** > **Add role assignment** to open the **Add role assignment** page.
5. Assign the following role. For more information, see [Assign Azure roles by using the Azure portal](https://learn.microsoft.com/en-us/azure/role-based-access-control/role-assignments-portal).
Expand table
| Setting | Value |
| ---------------- | --------------------------------- |
| Role | Owner and Storage Blob Data Owner |
| Assign access to | USER |
| Members | Your user name |
6. On the left pane, select **Containers** and create a container.
7. You can give the container any name. In this document, we name the container **users**.
8. Accept the default setting **Public access level**, and then select **Create**.
#### Configure access to the storage account from your workspace
Managed identities for your Azure Synapse Analytics workspace might already have access to the storage account. Follow these steps to make sure:
1. Open the [Azure portal](https://portal.azure.com/) and the primary storage account chosen for your workspace.
2. Select **Access control (IAM)**.
3. Select **Add** > **Add role assignment** to open the **Add role assignment** page.
4. Assign the following role. For more information, see [Assign Azure roles by using the Azure portal](https://learn.microsoft.com/en-us/azure/role-based-access-control/role-assignments-portal).
| Setting | Value |
| ---------------- | ----------------------------- |
| Role | Storage Blob Data Contributor |
| Assign access to | MANAGEDIDENTITY |
| Members | myworkspace |
Note: The managed identity name is also the workspace name.

5. Select **Save**.
### Create a serverless SQL pool while setting up the warehouse
You can refer to the following/refer [docs](https://learn.microsoft.com/en-us/azure/synapse-analytics/quickstart-create-apache-spark-pool-portal#navigate-to-the-synapse-workspace)
Create a new serverless Apache Spark pool using the Azure portal
* Azure Synapse Analytics offers various analytics engines to help you ingest, transform, model, analyze, and distribute your data.
* An Apache Spark pool provides open-source big data computing capabilities.
* After you create an Apache Spark pool in your Synapse workspace, data can be loaded, modelled, processed, and distributed for faster analytic insight.
Here, you'll learn how to use the Azure portal to create an Apache Spark pool in a Synapse workspace.
### Prerequisites
* You'll need an Azure subscription. If needed, [create a free Azure account](https://azure.microsoft.com/free/)
* You'll be using the [Synapse workspace](https://learn.microsoft.com/en-us/azure/synapse-analytics/quickstart-create-workspace).
### Sign in to the Azure portal
Sign in to the [Azure portal](https://portal.azure.com/)
### Navigate to the Synapse workspace
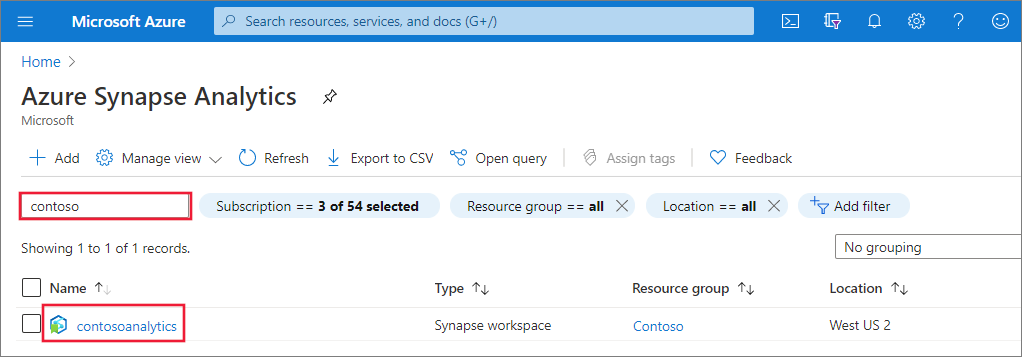
1. Navigate to the Synapse workspace where the Apache Spark pool will be created by typing the service name (or resource name directly) into the search bar.
[](https://learn.microsoft.com/en-us/azure/synapse-analytics/media/quickstart-create-sql-pool/create-sql-pool-00a.png#lightbox)
2. From the list of workspaces, type the name (or part of the name) of the workspace to open. For this example, we use a workspace named **contosoanalytics**.
[](https://learn.microsoft.com/en-us/azure/synapse-analytics/media/quickstart-create-sql-pool/create-sql-pool-00b.png#lightbox)
### Create new Apache Spark pool
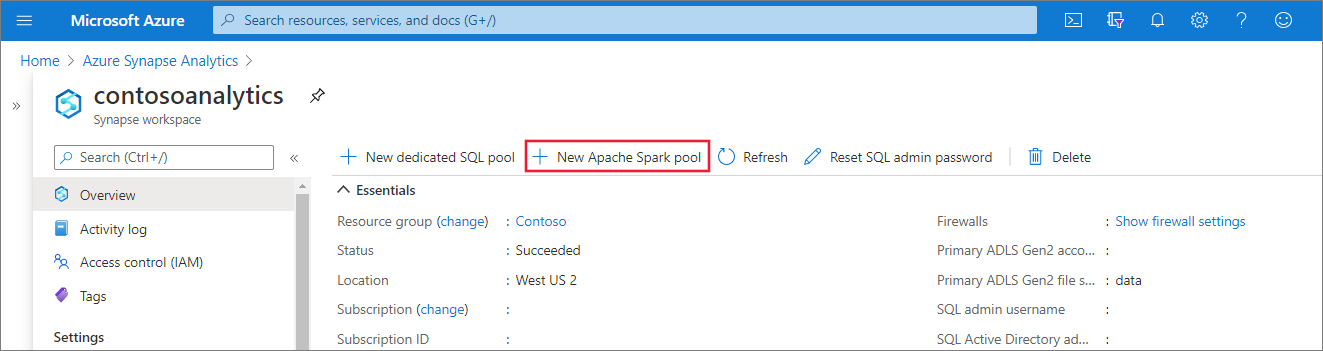
1. In the Synapse workspace where you want to create the Apache Spark pool, select **New Apache Spark pool**.
[](https://learn.microsoft.com/en-us/azure/synapse-analytics/media/quickstart-create-apache-spark-pool/create-spark-pool-portal-01.png#lightbox)
2. Enter the following details in the **Basics** tab:
[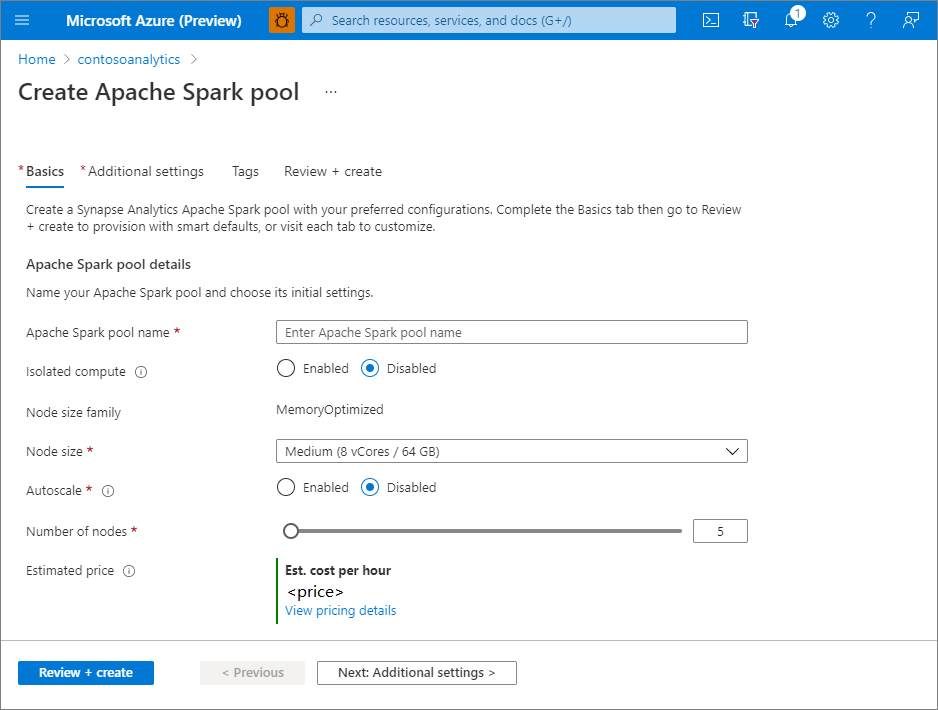](https://learn.microsoft.com/en-us/azure/synapse-analytics/media/quickstart-create-apache-spark-pool/create-spark-pool-portal-02.png#lightbox)
**Important**: There are specific limitations for the names that Apache Spark pools can use. Names must contain letters or numbers only, must be 15 or less characters, must start with a letter, not contain reserved words, and be unique in the workspace.
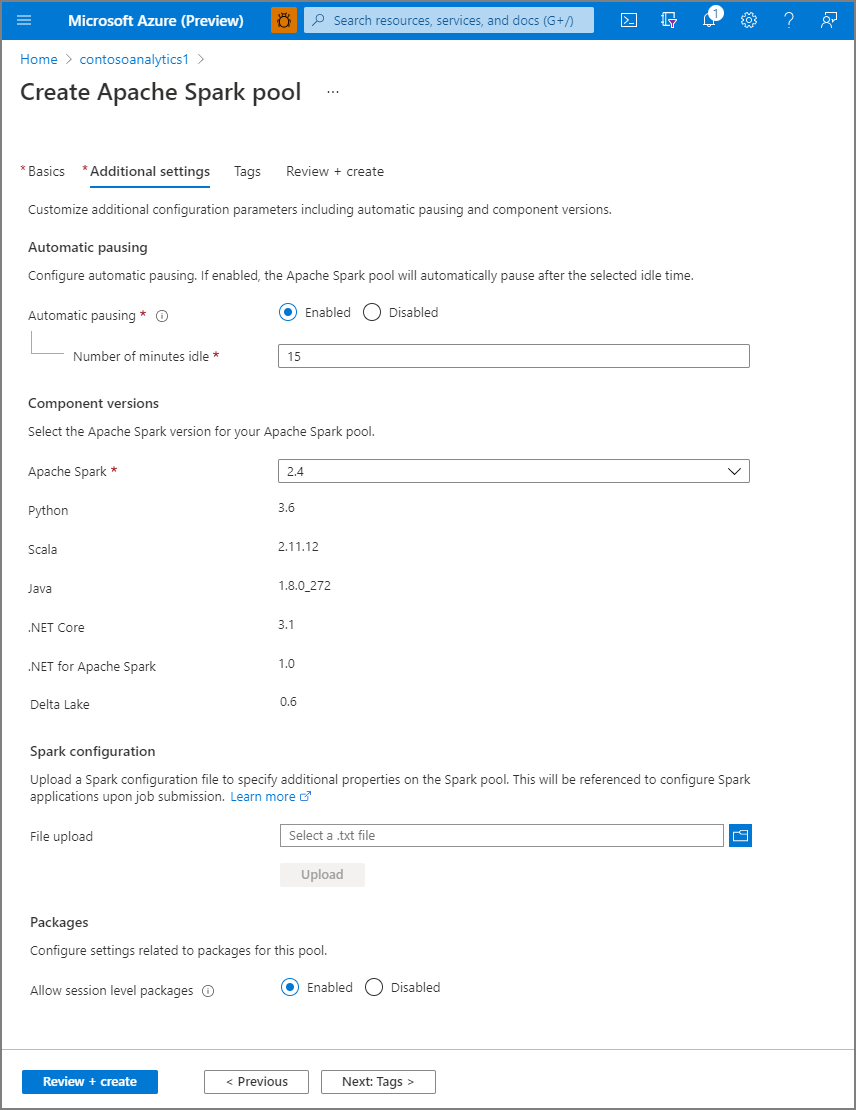
3. Select **Next: additional settings** and review the default settings. Don't modify any default settings.
[](https://learn.microsoft.com/en-us/azure/synapse-analytics/media/quickstart-create-apache-spark-pool/create-spark-pool-portal-03.png#lightbox)
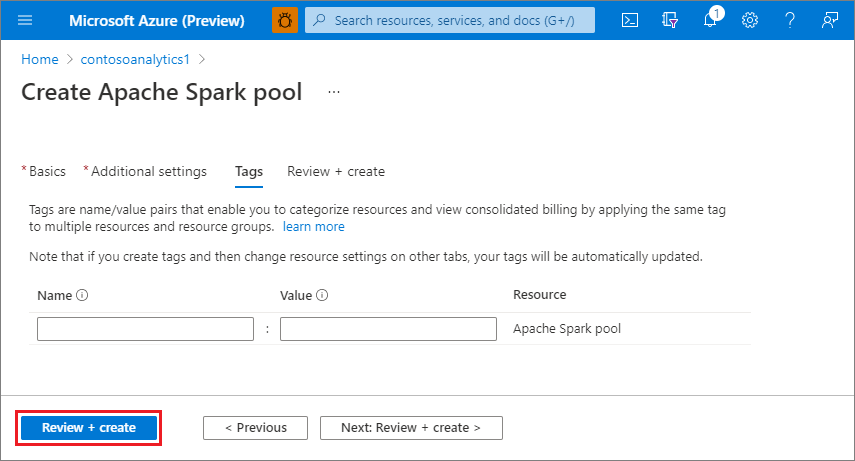
4. Select **Next: tags**. Consider using Azure tags. For example, the "Owner" or "CreatedBy" tag to identify who created the resource, and the "Environment" tag to identify whether this resource is in Production, Development, etc. For more information, see [Develop your naming and tagging strategy for Azure resources](https://learn.microsoft.com/en-us/azure/cloud-adoption-framework/ready/azure-best-practices/naming-and-tagging).
[](https://learn.microsoft.com/en-us/azure/synapse-analytics/media/quickstart-create-apache-spark-pool/create-spark-pool-03-tags.png#lightbox)
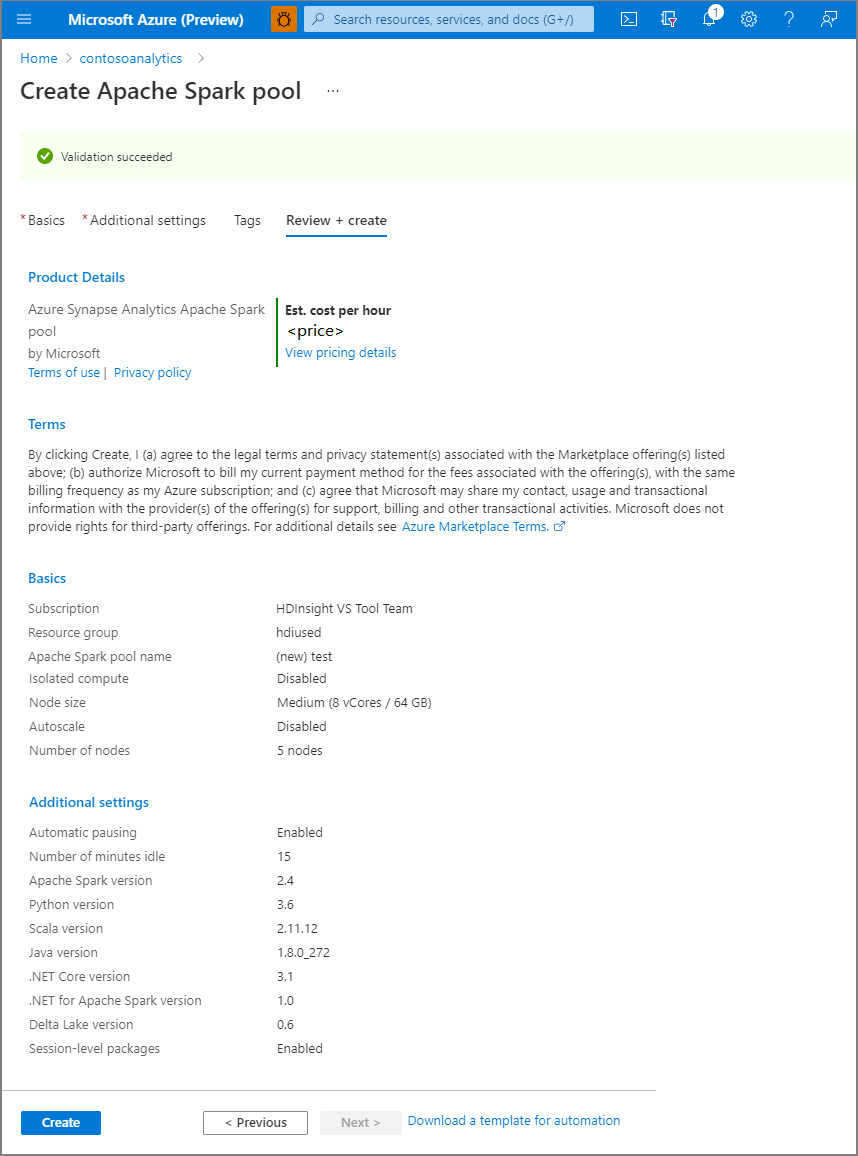
5. Select **Review + create**.
6. Make sure that the details look correct based on what was previously entered, and select **Create**.
[](https://learn.microsoft.com/en-us/azure/synapse-analytics/media/quickstart-create-apache-spark-pool/create-spark-pool-portal-05.png#lightbox)
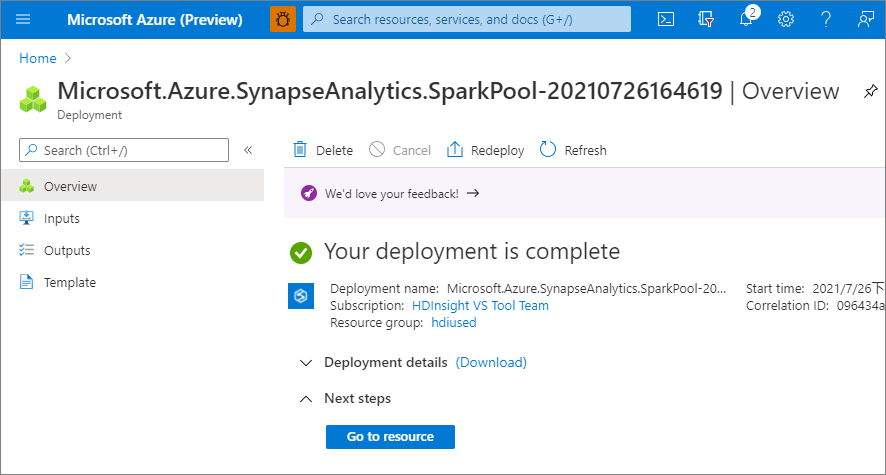
7. At this point, the resource provisioning flow will start, indicating once it's complete.
[](https://learn.microsoft.com/en-us/azure/synapse-analytics/media/quickstart-create-apache-spark-pool/create-spark-pool-portal-06.png#lightbox)
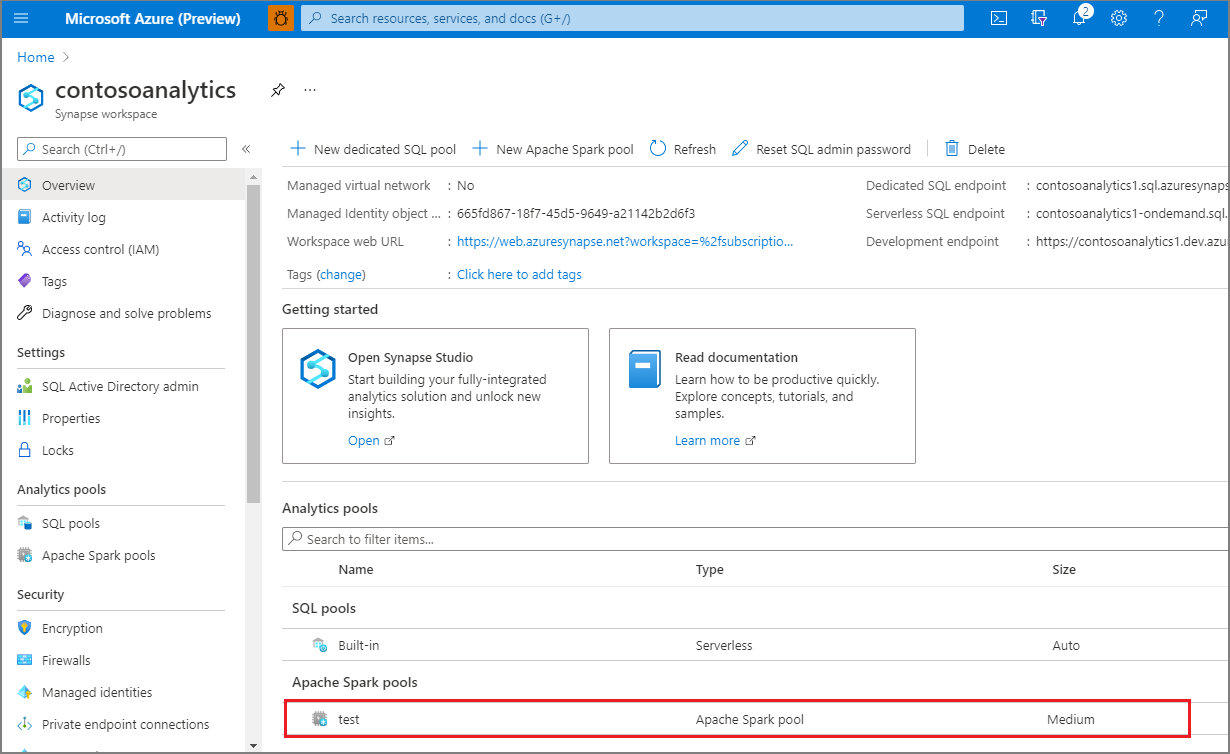
8. After the provisioning completes, navigating back to the workspace will show a new entry for the newly created Apache Spark pool.
[](https://learn.microsoft.com/en-us/azure/synapse-analytics/media/quickstart-create-apache-spark-pool/create-spark-pool-portal-07.png#lightbox)
9. At this point, there are no resources running, no charges for Spark, you have created metadata about the Spark instances you want to create.
### External data source creation
Create a new database which will be configured in Sprinkle:
```sql
CREATE DATABASE ;
```
* Need to use credential of Data Lake Storage Gen2 which is select during creation of Synapse Analytics.
* In Azure Portal on home page select storage then go to Security + Networking then go to Shared Access Signature
* Now select checkbox for Allowed resource types and provide start and end expiry date
* Click on Generate SAS and connection string.
* Copy the SAS token and use this in the below query:
```sql
CREATE DATABASE SCOPED CREDENTIAL
USE ;
CREATE MASTER KEY ENCRYPTION BY PASSWORD = '';
WITH IDENTITY = 'SHARED ACCESS SIGNATURE',
SECRET = '';
CREATE EXTERNAL DATA SOURCE
WITH
( LOCATION = 'https://.blob.core.windows.net/',
CREDENTIAL = );
```

 * On the left side under the Settings tab select connection strings. Select JDBC, here copy JDBC URL(remove username and password from JDBC URL).
